

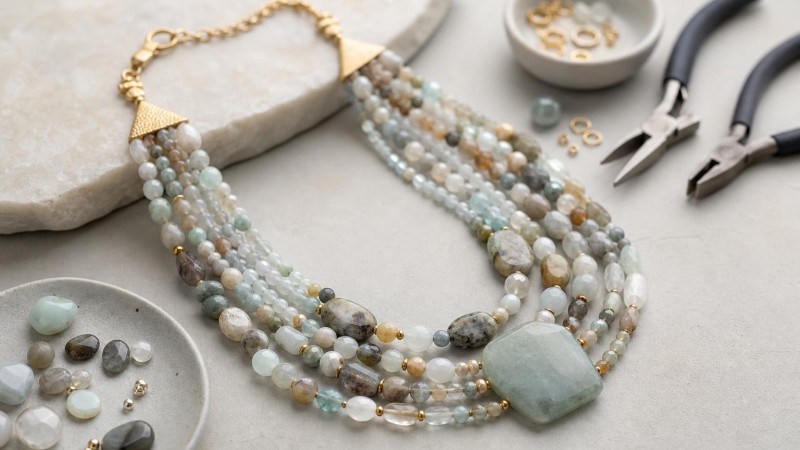
Why Safety Matters in Multi-Strand Necklace Design
A multi-strand statement necklace can transform an outfit with color, texture, and movement. It can also become one of the most technically demanding jewelry projects a maker attempts. Unlike a simple single-strand necklace, a statement design has more weight, more connection points, and more opportunities for tangling, uneven drape, or premature breakage. Building it safely means creating a necklace that not only looks polished but also wears comfortably and holds up over time.
Safety in jewelry making is about two things: protecting yourself while you work and constructing a finished piece that is secure for the wearer. Sharp wire ends, scattered beads on the floor, weak crimps, overloaded clasps, and poorly balanced strand lengths are all small issues that can turn into major frustrations. Taking a methodical approach helps you avoid wasted materials and gives your necklace a more professional finish.
If you enjoy working with natural materials such as amethyst beads, jasper, agate, or shell, a multi-strand format is especially rewarding because it lets you combine tones and shapes in a layered way. The key is to plan the structure before you begin, choose components that can handle the weight, and test each connection carefully.
What Makes a Multi-Strand Statement Necklace Different?
A statement necklace is designed to stand out. In a multi-strand version, that impact comes from several strands working together as a single composition. These strands may be uniform, graduated, asymmetrical, or mixed in texture. Some use gemstone rounds and spacers for a classic look, while others combine chips, pearls, chain, and focal elements for more drama.
Because multiple strands sit close together, their behavior matters as much as their appearance. Strands that are too similar in length can bunch awkwardly. Strands that are too far apart can twist. Heavy center sections can pull the necklace forward. If one side connector is stronger than the other, the whole necklace may hang unevenly. Good design solves these problems before the necklace is ever worn.
Historically, layered necklaces have appeared in many cultures, from ancient collars to ceremonial beadwork and ornate court jewelry. Gemstones used in these pieces often carried symbolic meaning. For example, in folklore, amethyst was associated with clarity and calm, while pearls were traditionally regarded as symbols of purity and refinement. When you design with natural stones today, you can appreciate both their visual beauty and the long history of meaning people attached to them.
Essential Tools and Materials
Before you start, gather all tools and supplies in one clean, well-lit workspace. A tray or bead mat helps keep small components from rolling away and reduces the risk of stepping on dropped findings.
Core tools
- Round-nose pliers for making loops
- Chain-nose or flat-nose pliers for gripping and opening findings
- Flush cutters for trimming wire cleanly
- Crimping pliers if using crimp beads or tubes
- Bead mat or towel to prevent rolling
- Ruler or necklace design board for planning lengths
Common materials
- Beading wire, nylon-coated stringing wire, or strong thread suited to bead weight
- Crimp tubes or beads
- Clasp strong enough for the finished necklace
- Strand separators or multi-strand connectors
- Spacer beads, focal beads, chain, and accent components
- Findings such as jump rings and bead tips
- Optional wire elements made with wire wrappers or wrapped connectors
For an elegant layered effect, many makers combine polished stones with freshwater pearls or metal accents. The best mix depends on your design, but always consider total weight. A glamorous necklace still needs to be wearable.
Choosing the Right Stringing Material for Safety
One of the biggest mistakes in statement necklace construction is using a stringing material that is too delicate for the beads. Heavier gemstones need support. If your strands include larger natural stone beads, metal spacers, or a substantial focal piece, choose a beading wire with enough strength and flexibility to handle the load without kinking excessively.
Fine thread may work beautifully for lightweight seed beads, but it is not always appropriate for a bold, multi-strand gemstone necklace. Nylon-coated beading wire is a popular choice because it combines strength with drape. For designs that need more structure, certain wires or stiffer cords may perform better. Always check that the holes of your beads accommodate the material you choose without forcing it.
Test compatibility before stringing a full necklace. Run a short sample through your largest and smallest beads, add a crimp or knot as planned, and bend the sample gently. This quick trial can reveal issues with fit, fraying, stiffness, or visible stress before you commit to the entire project.
How to Plan Strand Lengths So They Drape Properly
Successful multi-strand necklaces depend on graduated lengths. Even a small difference between strands can affect how the necklace sits. If the strands are too close in size, they may overlap or twist into each other. If they are spaced thoughtfully, each one remains visible and contributes to the layered look.
A good starting point is to make each strand slightly longer than the one above it. The exact difference depends on bead size, the width of your side connectors, and whether the strands contain chunky centerpieces. Larger beads take up more physical space, so they can shorten the apparent drape if not accounted for in your measurements.
Planning tips
- Lay out each strand on a design board before stringing permanently
- Measure from connector to connector, not just bead length
- Account for crimps, loops, and clasp hardware
- Test drape by lifting both ends before finishing
- Adjust center-heavy strands so they do not pull forward
If your design includes graduated stone sizes, place the heaviest beads near the center where they can be supported evenly. This improves both comfort and stability.
Best Practices for Selecting Clasps and Connectors
In a multi-strand necklace, the clasp is a structural component, not an afterthought. A delicate clasp on a heavy necklace is one of the most common failure points. Choose a clasp that is proportionate to the weight of the finished piece and easy to operate. Lobster clasps, sturdy toggles, and quality box clasps are all options depending on the style.
Side connectors and strand separators also play an important role. These findings keep the strands organized and help maintain spacing. They should have smooth edges and solid construction so they do not abrade the stringing material over time. If you are making your own side components from wire, smooth every cut end thoroughly and check that loops are fully closed.
Use two pairs of pliers when opening and closing metal findings to preserve their shape. Twisting a finding sideways rather than pulling it apart helps maintain strength. This matters especially with connectors and jump rings, which may bear significant strain in a statement necklace.
Step-by-Step: How to Make a Multi-Strand Statement Necklace Safely
1. Sketch the design
Start with a simple plan. Decide how many strands you want, what the focal area will be, and whether the necklace will look symmetrical or organic. A quick sketch can help you distribute colors and materials evenly.
2. Lay out the beads
Arrange each strand on a bead board or mat. Check color balance, texture contrast, and overall shape. This is also the best time to decide where accent beads, metal spacers, or pearls should go.
3. Pre-measure each strand
Measure every strand individually, including the length added by connectors, wire guardians, crimps, or loops. Label them if needed so they do not get mixed up during assembly.
4. String one test strand first
Before committing to the full necklace, finish one complete strand and test its drape and strength. If it twists, feels stiff, or hangs too short, adjust now rather than rebuilding the whole piece.
5. Secure the ends carefully
Use properly sized crimp tubes or your preferred secure finishing method. Compress crimps neatly, then tug gently to test them. If using knots with thread, add suitable end protection and trim cleanly.
6. Assemble in order
Attach strands from shortest to longest, checking that none cross or snag. Work slowly to avoid scratching softer stones or bending components out of shape.
7. Add the clasp last
Once all strands are connected and balanced, attach the clasp. Open and close it a few times to confirm it functions smoothly.
8. Perform a final safety check
Inspect for sharp ends, weak crimps, gaps in wrapped loops, and rough connector edges. Lift the necklace, lay it flat, and drape it again to make sure it behaves well in different positions.
How to Prevent Tangling and Twisting
Tangling is one of the biggest frustrations with multi-strand jewelry. Good construction can reduce it significantly. The first defense is proper strand spacing. Connectors or separators help keep each strand in place so they do not collapse into each other.
Another key factor is consistency of weight. If one strand is dramatically heavier than the others, it can rotate or pull the entire necklace off balance. Mixing textures is beautiful, but the necklace still needs harmony in structure. Keep bulkier beads near the center and use lighter transitions toward the sides.
Flexible yet supportive stringing material also helps. Strands that are too stiff may stand awkwardly, while strands that are too limp may knot together in storage. Once the necklace is complete, store it flat or hanging with enough room so the strands are not compressed together.
Comfort and Wearability Tips
A statement necklace should feel substantial, not exhausting. Weight distribution matters as much as visual impact. If your beads are very heavy, consider reducing the number of strands, combining gemstone sections with lighter chain, or using smaller stones near the back of the neck. These changes can preserve the look while improving comfort.
Also think about surface feel. Rough chips, large faceted edges, and metal findings with burrs can irritate skin or catch delicate fabrics. Smooth all wire ends and inspect the back of the necklace as carefully as the front.
- Choose rounded or polished beads for areas near the neck
- Keep the heaviest focal cluster near the center front
- Use lightweight spacer sections near the clasp
- Check that separators lie flat instead of digging inward
- Test the necklace over fabric before final wear
Common Mistakes to Avoid
Many necklace problems come from rushing the finishing stage. Beautiful beads cannot compensate for weak construction. Avoid oversized holes with undersized stringing wire, poor-quality findings, and crimps that are not matched to the cable diameter.
Another frequent mistake is failing to test the finished piece before considering it done. A necklace may look perfect on the table but behave differently when lifted or draped. Always test movement, clasp operation, and strand alignment.
Do not overlook bead hole quality either. Some gemstone beads have sharper inner edges than others. If a strand will carry weight and movement, rough holes can gradually wear the stringing material. Inspect beads in advance and reserve problematic ones for less demanding parts of the design.
Design Ideas for a Balanced, High-Impact Look
If you want a refined statement style, combine several textures within a controlled color palette. Soft neutrals with polished gemstones and pearls create an elegant layered piece. Earthy stones mixed with antique metal accents can feel rustic and dramatic. High-contrast black, white, and metallic combinations often produce a modern editorial effect.
You can also vary shape while keeping color consistent. Round beads, rondelles, coins, and bar components create visual interest without looking chaotic. If you prefer a more symbolic palette, choose stones associated in tradition with particular meanings. In folklore, some makers favored amethyst for composure, lapis for wisdom, or rose-toned stones for affection. Used thoughtfully, these references can add storytelling to your necklace design.
Final Inspection and Care After Assembly
Before wearing or gifting the necklace, give it a final inspection under bright light. Check every crimp, loop, ring, and clasp connection. Run your fingers gently along the necklace to detect sharp points or snagging areas. If anything shifts unexpectedly during handling, rework it now.
To help preserve the necklace, store it separately from harder pieces that may scratch polished stones or pearls. Keep strands untangled by laying the necklace flat in a compartmented box or hanging it with enough space. Avoid exposing natural materials to excessive moisture or rough surfaces.
With careful planning and secure construction, a multi-strand statement necklace can be both bold and dependable. The best pieces are not only eye-catching on the outside but thoughtfully engineered on the inside. Whether you are creating a dramatic gemstone collar or a softly layered pearl-and-stone design, building safely lets your craftsmanship shine. For makers exploring creative supplies and components, PebbleBead offers plenty of inspiration for turning well-chosen materials into wearable statement jewelry.

Leave a Comment