

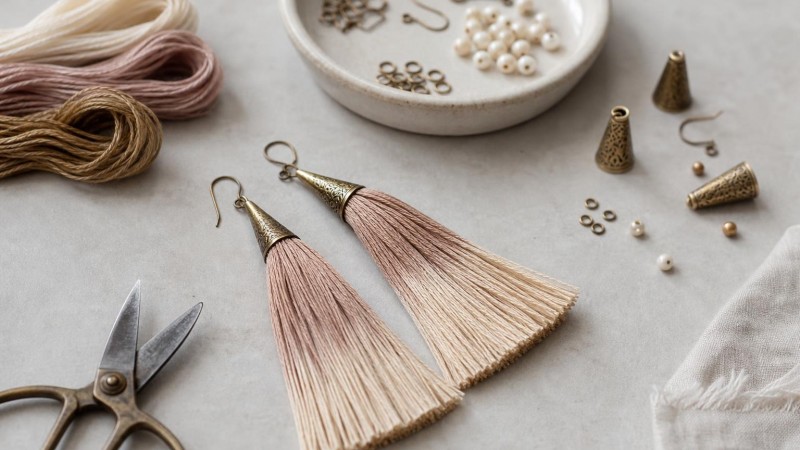
Why Tassel Earrings Are a Favorite DIY Jewelry Project
Tassel earrings bring together movement, color, and texture in a way that feels both playful and polished. They can be minimal and elegant in a single shade, or bold and expressive when made with layered colors and decorative accents. One of the best things about this style is how approachable it is for beginners. With embroidery floss, metal cones, and a few basic findings, you can create earrings that look refined without needing advanced metalworking or bead-weaving skills.
Embroidery floss is especially appealing for jewelry making because it comes in a huge range of colors, has a soft sheen, and is easy to cut, wrap, and shape. When paired with cone findings, the tassel top looks neat and professional. You get the softness of thread with the structure of metal, which makes the finished design feel balanced and wearable.
For jewelry makers who enjoy customizing every detail, this project also leaves plenty of room for creativity. You can pair tassels with gemstone accents, seed beads, chain, or small charms. A pair finished with amethyst beads can feel romantic and rich, while neutral floss and warm-toned metal cones create a more earthy, everyday look.
Materials You Need for Tassel Earrings
Before you begin, gather all your supplies so the process feels smooth and organized. The exact materials can vary depending on your design, but the essentials are simple.
- Embroidery floss in one or more colors
- Metal cones sized to fit your tassels
- Earring hooks or lever backs
- Head pins or eye pins
- Sharp scissors
- Ruler or measuring tape
- Strong jewelry adhesive, if needed
- Round-nose pliers
- Chain-nose pliers
- Optional accent beads, charms, or spacers
If your design includes connecting components, keep a few jump rings nearby. They are useful when attaching tassels to ear wires, adding charms, or adjusting the drop length of the earring. Choosing quality findings matters here because tassel earrings move a lot during wear, and secure connections help them last.
Choosing the Right Embroidery Floss
Not all tassels behave the same way, and much depends on the floss you select. Standard six-strand cotton embroidery floss is the most common option. It is easy to find, affordable, and available in nearly every color family imaginable. Cotton gives tassels a soft, matte-to-satin finish and a pleasant drape.
You can use rayon or silk-style embroidery threads for a shinier, more fluid tassel, but these may be a little more slippery to work with. Beginners often find cotton easier to control when wrapping, tying, and trimming. If you want a fuller tassel, use more strands or wrap the floss more times around your template.
Color selection also shapes the entire mood of the earrings. Jewel tones feel dramatic, pastels feel airy and romantic, and monochrome neutrals create a modern look. Variegated floss can add subtle shifts in color without requiring complicated design work.
Selecting Metal Cones for a Professional Finish
Metal cones are what transform a simple thread tassel into jewelry. They hide the tied top, create a clean transition to the ear wire, and add structure and shine. Cones come in different lengths, widths, and decorative styles, from sleek smooth finishes to ornate filigree patterns.
Choose cones wide enough to comfortably cover the top of the tassel without crushing the thread too tightly. If the cone is too narrow, the tassel may bunch awkwardly. If it is too wide, the top can look loose and unfinished. It is often worth making a test tassel first so you can check the fit before assembling the final pair.
Finish matters too. Gold-tone cones warm up earthy and vibrant floss colors, while silver-tone cones tend to complement cool blues, grays, and crisp modern palettes. Antique brass can add a vintage feel, especially when paired with natural textures or small freshwater pearls for contrast.
How to Make Tassels Step by Step
The basic tassel-making method is straightforward, but precision makes a big difference. Taking your time at each stage will help both earrings match and hang evenly.
1. Cut a Template for Consistent Length
Use a piece of cardboard, a jewelry card, or a small ruler as a wrapping template. The height of the template should be about twice the finished tassel length, since the looped floss will be folded before trimming. For example, if you want a tassel around 2 inches long, begin with a template about 4 inches tall.
Using the same template for both earrings helps keep them symmetrical. Consistency is especially important with statement earrings, where even slight differences in length become noticeable.
2. Wrap the Floss
Wrap the embroidery floss around the template multiple times until you reach the fullness you want. More wraps create a denser tassel. Fewer wraps create a lighter, more delicate effect. Try to keep the tension fairly even as you wrap, so one side does not end up thicker than the other.
For layered tassels, you can wrap different colors one after another or make separate mini tassels and combine them. This is a great way to create ombre, color-blocked, or seasonal designs.
3. Tie the Top Securely
Slide a separate piece of floss or fine cord under the wrapped bundle at the top edge of the template, then tie it tightly. This knot will hold the tassel together, so make it secure. Some jewelry makers double-knot and add a tiny dab of adhesive for extra durability, especially if the tassel will sit inside a cone with movement around the top connection.
At this stage, you can leave a longer tail from the tied section if you plan to attach it directly to an eye pin or another finding.
4. Cut the Bottom Loops
Carefully remove the tied bundle from the template and cut through the opposite loops to create the tassel fringe. Use very sharp scissors for a clean edge. Dull blades can leave fuzzy or uneven ends, which makes the tassel look less polished.
After cutting, smooth the threads gently with your fingers so they hang naturally. If the floss has twisted during wrapping, let it relax before trimming.
5. Shape and Trim
Hold the tassel by the top and trim the ends so they are even. It helps to cut a little at a time rather than trying to make one large cut. You can create a blunt straight edge, a slight taper, or even a soft rounded silhouette depending on your style.
This is also the moment to decide whether the tassel needs thinning. If it looks too bulky for your cone, remove a few strands before final assembly.
Attaching Tassels to Metal Cones
Once your tassels are made, it is time to add the metal cones and transform them into earrings. This step is where the design starts to feel finished.
Use Eye Pins or Head Pins for Structure
One common method is to thread an eye pin through the top of the tassel, then slide the cone over it. Depending on the cone style, the pin may pass through a hole at the top and connect directly to the ear wire. In some designs, the tassel is glued into the cone and the pin is used as the hanging connection above it.
If you are adding gemstone details between the cone and the ear wire, an eye pin gives you a secure way to build upward. Small accent beads can add sparkle, color, or symbolic meaning. In folklore, some gemstones were associated with balance, clarity, or protection, which is one reason bead-accented tassel earrings remain popular in handmade jewelry traditions.
When to Use Adhesive
Some cone findings fit snugly enough that the tassel stays in place with friction and the internal loop alone. Others benefit from a tiny amount of jewelry adhesive inside the cone. If you use glue, apply it sparingly. Too much can seep into the threads or out around the cone opening.
Let the adhesive cure fully before wearing or packaging the earrings. Patience here helps prevent shifting and keeps the tassel centered.
Connect the Ear Wires
Once the cone and top connection are secure, use pliers to attach the tassel unit to your ear wire. Open loops by twisting them sideways rather than pulling them apart front to back. This helps maintain the loop shape and creates a more secure closure when you twist it back into place.
If your design includes an extra connector, bead link, or chain segment, this is where wire wrappers and basic pliers can help refine your assembly and make each join tidy.
Design Ideas to Make Your Tassel Earrings Stand Out
A basic tassel earring is lovely on its own, but small design adjustments can make your pieces feel unique and memorable. Try these ideas to develop your style.
Add Beaded Accents
Place a few beads above the cone to introduce contrast and visual rhythm. Faceted stones can add sparkle, while smooth round beads keep the design softer. Tiny metal spacers can help transition between the cone and larger beads. If you want a more organic look, irregular stone beads or small pearls work beautifully.
Be sure the accent elements complement the tassel rather than overpower it. Since tassels already have movement and texture, a few carefully chosen details usually look better than too many competing components.
Play with Color Layering
Instead of using one thread color, combine two or three tones in the same tassel. You might pair blush with burgundy, teal with navy, or cream with gold-toned findings for a subtle effect. Contrasting shades create a bolder statement, while neighboring colors create depth without looking busy.
Seasonal palettes are another fun direction: fresh greens and florals for spring, oceanic blues for summer, warm rust and mustard for autumn, or rich jewel tones for winter celebrations.
Experiment with Length
Short tassel earrings feel easy and versatile for everyday wear. Medium lengths often strike the best balance between movement and comfort. Long tassels make a statement and can look dramatic with evening outfits, but they should still be lightweight enough to wear comfortably.
Test the proportion by holding the unfinished earring near the ear or against a display card before final assembly. The cone size, bead accents, and tassel length should feel visually balanced.
Common Mistakes and How to Avoid Them
Even simple jewelry projects have a few trouble spots. Knowing what to watch for can save time and help your earrings look more professional.
- Uneven tassels: Use the same template and count similar wraps for both earrings.
- Bulky tops: Reduce the number of strands or choose a wider cone.
- Frayed ends: Trim with sharp scissors and handle the cut ends gently.
- Loose assembly: Double-check knots, loops, and adhesive cure time.
- Heavy earrings: Keep accents light so the earrings remain comfortable.
It is also smart to make one full sample earring before producing a pair. This lets you test fit, length, and cone size before duplicating the design.
Tips for Better Finishing and Longer Wear
Good finishing separates a casual craft project from a polished handmade accessory. After trimming, smooth the tassel strands and inspect them under bright light. Remove any stray threads and check that both earrings hang at the same angle.
Store tassel earrings flat or hanging so the fringe stays straight. If the floss becomes bent during storage, you can often smooth it gently with your fingers. Keep tassels away from excess moisture, perfumes, and rough surfaces that might snag the threads.
When choosing findings, look for sturdy ear wires and well-made cones. Quality components support the lifespan of the finished earrings and elevate the overall appearance. A simple tassel can look surprisingly luxurious when the finishing details are neat and intentional.
Why This Project Works for Beginners and Experienced Makers
Tassel earrings with embroidery floss and metal cones are ideal for beginners because they teach useful core skills: measuring, wrapping, trimming, attaching findings, and creating balanced pairs. At the same time, experienced jewelry makers appreciate them because they are highly adaptable. A small change in floss type, cone shape, bead accent, or metal finish can completely shift the aesthetic.
They are also a good project for using supplies already in your studio. Leftover thread, small beads, cone findings, and spare ear wires can all become part of a fresh design. This makes tassel earrings a creative way to experiment without needing a large list of specialized materials.
For makers who love natural elements, tassels pair especially well with stone and pearl accents. A few thoughtfully chosen components can turn a simple earring into something that feels artisanal, expressive, and ready to wear.
Final Thoughts on Creating Tassel Earrings
Creating tassel earrings with embroidery floss and metal cones is a rewarding project that blends softness and structure in a beautiful way. With just a few tools and supplies, you can make lightweight earrings that feel colorful, stylish, and distinctly handmade. Whether you prefer minimalist neutrals, bright statement shades, or bead-enhanced designs, the technique is easy to adapt to your personal style.
The key is to focus on clean construction: even wrapping, secure knots, well-fitted cones, and careful trimming. Once you master the basics, you can branch into endless variations with decorative findings, gemstone accents, and layered color combinations. If you enjoy making jewelry that offers both creativity and practical wearability, tassel earrings are well worth exploring at PebbleBead and beyond.

Leave a Comment