

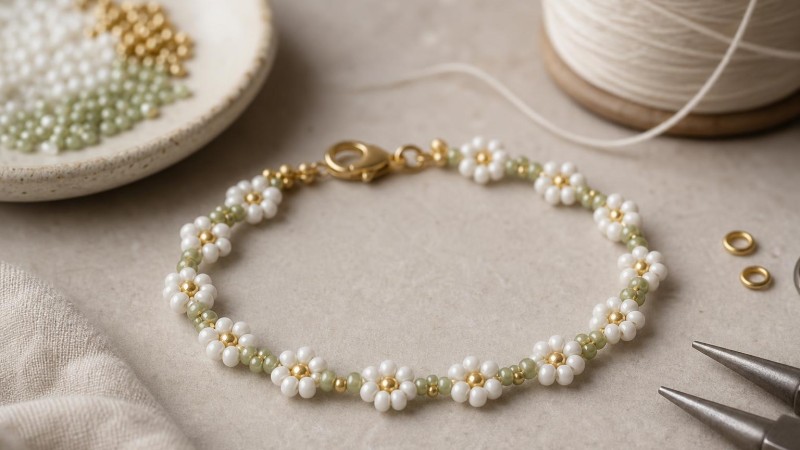
A beaded daisy chain bracelet is one of those jewelry projects that looks cheerful, detailed, and surprisingly polished, yet it is approachable even for beginners. If you have ever admired flower-shaped beadwork and wondered how to make it yourself, this tutorial will walk you through the process clearly from start to finish. With a small selection of seed beads, a flexible stringing material, and a little patience, you can create a bracelet that feels handmade in the best possible way.
This style is especially popular because it is endlessly customizable. You can make a classic white-and-yellow daisy design, try bright rainbow flowers, use soft pastel tones, or create a more elevated look with metallic accents and gemstones. It is also a great stash-busting project for extra seed beads and small accent beads you may already have in your bead collection from PebbleBead.
In this guide, you will learn what materials to gather, how the daisy chain pattern works, how to form each flower neatly, and how to finish the bracelet securely. Along the way, you will also find troubleshooting tips, design ideas, and suggestions for upgrading the pattern with specialty beads like freshwater pearls.
What Is a Beaded Daisy Chain Bracelet?
A beaded daisy chain bracelet is a strand of connected flower motifs made from small beads. Each daisy usually has a center bead surrounded by several petal beads, and the flowers link together in a repeating sequence. The result is lightweight, flexible, and playful, making it a favorite project for spring and summer jewelry, friendship bracelets, festival accessories, and beginner bead weaving practice.
The technique has remained popular for decades because it combines simple repetition with lots of room for creativity. Once you understand the basic structure, you can change the bead size, color palette, spacing, and closure style. You can keep the bracelet delicate and minimal or make it more expressive with bolder colors and mixed textures.
Historically, floral jewelry motifs have been cherished in many cultures as symbols of beauty, renewal, celebration, and affection. In modern jewelry making, the daisy chain remains beloved because it feels both nostalgic and fresh.
Materials You Will Need
Before you begin, gather your tools and supplies. Keeping everything within reach makes the process smoother and helps you maintain even tension as you work.
Basic supplies
- Seed beads for petals, typically size 11/0 or 10/0
- Seed beads or accent beads for flower centers
- Beading thread, nylon cord, or elastic cord depending on your preferred finish
- A beading needle if using thread
- Scissors or thread snips
- Bead mat or soft work surface
- Ruler or measuring tape
- Clasp if making a non-stretch bracelet
Optional supplies
- Crimp beads and covers for certain stringing materials
- Beading glue for knot security
- Spacer beads for extra detail
- jump rings for attaching a clasp
- Charm accents for personalization
If you want to add a touch of color variation or a more natural feel, you can mix in tiny gemstone rounds or specialty beads. Delicate accents such as amethyst beads can add contrast, and in folklore amethyst was often associated with calm and clarity, which is one reason it remains a meaningful choice in handmade jewelry.
Choosing the Best Stringing Material
The material you string on affects both the look of the bracelet and how you finish it. There are three common options for a daisy chain bracelet.
Elastic cord
Elastic is beginner-friendly and great for a slip-on bracelet with no clasp. It is easy to wear and quick to finish, but it works best when the bead holes are large enough to accommodate the cord. Choose a fine, strong elastic designed for jewelry rather than craft elastic.
Nylon beading thread
Nylon thread gives a neat, flexible result and is ideal for a more refined beadwoven look. It is often used with a beading needle and allows for multiple passes through beads, which can strengthen the flower motifs.
Fine jewelry wire
Beading wire is less common for a traditional daisy chain but can work if your design uses spacers and a clasped construction. It offers durability, though it is not as suitable for repeated weaving through the same bead pattern.
For most classic daisy chain bracelets, nylon beading thread or fine elastic cord is the easiest and most effective choice.
How the Daisy Chain Pattern Works
The structure is simpler than it looks. Each flower is formed by stringing a sequence of petal beads around one center bead, then passing back through selected beads to close the flower and begin the next one. In many versions, the last few beads of one flower help connect to the next flower, creating a continuous chain.
A common daisy uses six petal beads and one center bead, but you may also see versions with five or eight petals depending on the bead size and desired shape. Consistency matters: if you use the same number of petals each time and keep even tension, your bracelet will look tidy and balanced.
Think of each flower as a tiny loop with a focal bead in the middle. Once you make the first two or three flowers, the rhythm becomes easy to remember.
Step-by-Step Tutorial
Step 1: Measure your bracelet length
Decide how long you want your finished bracelet to be. A common bracelet length is around 6.5 to 7.5 inches, but the best fit depends on wrist size and whether you want a snug or relaxed fit. If using a clasp, remember to include the clasp length in your measurement. If using elastic, allow just enough stretch for comfort without making the bracelet loose.
Step 2: Prepare your thread or cord
Cut a workable length of thread or cord. For beginners, it is often easier to start with more than you think you need, around 24 to 36 inches, rather than joining thread later. If using nylon thread, thread your needle and, if desired, leave a short tail for tying off at the end.
If you are working with elastic, avoid overly long lengths because elastic can tangle more easily. Pre-stretching the elastic gently can help reduce later slack.
Step 3: String the first flower
Pick up your first petal beads and center bead in this sequence: three petal beads, one center bead, and three more petal beads. Slide them down the thread, leaving enough tail if you need one for finishing.
Next, pass your needle or cord back through the very first petal bead you added, pulling carefully until the beads form a flower-shaped loop. The center bead should sit in the middle, with the petal beads encircling it. Adjust the beads gently so the flower looks even.
This first flower is your foundation, so take a moment to check that the petals are sitting nicely and that the tension is snug but not too tight.
Step 4: Begin the second flower
To create the next daisy, pick up three new petal beads, one center bead, and two new petal beads. Then pass through the petal bead that will connect the new flower to the previous one, following your chosen pattern direction. In many classic daisy chains, one petal from the first flower becomes part of the second flower, which is what creates the linked effect.
As you pull the thread, the new beads should curve into another flower shape attached to the first. At this point, the pattern starts to make sense visually. Continue to keep your tension even so the flowers are linked firmly without buckling.
Step 5: Repeat the pattern
Continue adding flowers one by one using the same bead count and threading path. Work slowly at first, checking each flower before moving on. It is much easier to fix a tension issue after one flower than after ten.
If you want a classic daisy look, keep the petal color the same and use a contrasting center, such as white petals with a yellow center. For a more whimsical bracelet, change center colors from flower to flower or alternate petal shades in a repeating pattern.
A bead mat is especially useful during this stage because seed beads can roll easily. Some makers also like to lay out each flower in advance to preview the color order.
Step 6: Check the fit as you go
After several flowers, wrap the chain gently around your wrist or measure it with a ruler. This helps you estimate how many more flowers you need. Keep in mind that certain bead combinations may make the bracelet slightly longer or shorter than expected, especially if some beads are more rounded or larger than others.
Do not wait until the very end to measure. Small differences in bead size can add up across a full bracelet length.
Step 7: Finish the bracelet
How you finish depends on the stringing material you chose.
- For elastic: Tie a secure surgeon’s knot or double knot, test the tension, add a tiny drop of jewelry-safe adhesive if desired, and hide the knot inside a bead if possible.
- For thread with a clasp: Attach the clasp ends, weave back through nearby beads for security, knot discreetly between beads, and trim the excess.
- For beading wire: Use crimps and findings appropriate for your design.
If you are adding a clasp, simple findings and small connectors keep the bracelet elegant. Some designs may also pair well with delicate components used in projects alongside wire wrappers.
Tips for Making Your Daisy Chain Look Neat
Keep tension consistent
Loose tension can make the flowers floppy, while overly tight tension can warp the shape or curl the bracelet. Aim for a firm but flexible feel.
Use uniform beads
Even slight differences in seed bead size can affect the symmetry of each flower. If possible, use beads from the same manufacturer and line for the most even result.
Choose center beads carefully
The center bead should sit comfortably inside the petal ring. If it is too large, the flower may distort. If it is too small, the flower may look open and less defined.
Reinforce if needed
For extra durability, some beaders like to pass through parts of the motif a second time. This can help stabilize the flowers, especially in bracelets that will be worn often.
Creative Variations to Try
Pastel spring bracelet
Use soft pink, lavender, mint, and butter-yellow petals for a gentle seasonal palette. A tiny gold spacer between every few flowers can add polish.
Rainbow daisy chain
Change the petal color with every flower for a bright, playful bracelet. This is a fun way to use leftover seed beads from other projects.
Gemstone-accent version
Add tiny stone rounds between flower sections for texture and color depth. Beads like rose quartz, jade, or aventurine can create a more natural look. In traditional lore, different stones were often associated with emotional symbolism or protective meanings, which makes them especially appealing in personal jewelry design.
Pearl-inspired floral bracelet
Swap some seed bead centers or spacers for petite pearls for a softer, dressier interpretation. This style works beautifully for bridal accessories, garden-party jewelry, or heirloom-inspired handmade gifts.
Common Mistakes and How to Fix Them
The flowers do not lie flat
This usually means the tension is uneven or the bead sizes are inconsistent. Try remaking one section with slightly firmer tension and make sure your petal beads are closely matched in size.
The center bead slips out of place
If the center does not sit well, it may be too small for the number and size of petals. Try a slightly larger center bead or reduce the petal count.
The bracelet feels stiff
Stiffness can happen if the thread is pulled too tightly or if the beads are packed together without enough flexibility. Ease up on the tension slightly and avoid forcing the motif closed.
The bracelet is too short or too long
Add or remove one or two flower units rather than trying to compensate only with the clasp. Because the pattern is modular, it is easy to adjust the length before final finishing.
Best Bead Color Combinations for Daisy Bracelets
If you are unsure where to start, classic color combinations are always dependable. White petals with yellow centers instantly read as daisies. Pink petals with gold centers feel sweet and romantic. Blue and white combinations can look fresh and coastal, while black petals with metallic centers create a modern graphic effect.
For a more earthy style, combine cream, sage, terracotta, and muted amber tones. Natural accents can pair beautifully with materials such as seed beads, tiny gemstone rounds, and metal findings. If you are building out your supply collection, essentials like jump rings and coordinated bead colors make it easier to create matching sets later.
Why This Project Is Great for Beginners
A beaded daisy chain bracelet teaches several foundational jewelry-making skills in one manageable project. You practice bead handling, color planning, pattern repetition, measuring, tension control, and finishing techniques. Because each flower is small and repetitive, the learning curve feels friendly rather than overwhelming.
It is also a satisfying project because you see progress quickly. After the first few flowers, the bracelet begins to take shape, which can build confidence for trying other beaded jewelry patterns later. Many makers who start with daisy chains go on to create anklets, necklaces, earrings, and layered bracelets using similar techniques.
Final Thoughts
An easy beaded daisy chain bracelet is proof that simple materials can become something charming and expressive. Whether you choose a classic flower palette or experiment with gemstones, pearls, and metallic accents, this project offers a wonderful balance of structure and creativity.
Take your time with the first few flowers, pay attention to tension, and do not be afraid to test different bead combinations until the design feels right. Once you master the basic pattern, you can adapt it in countless ways and make each bracelet uniquely your own.
If you enjoy thoughtful, nature-inspired jewelry projects, a daisy chain bracelet is a delightful addition to your handmade collection and a lovely way to explore the world of beading with supplies from PebbleBead.

Leave a Comment