

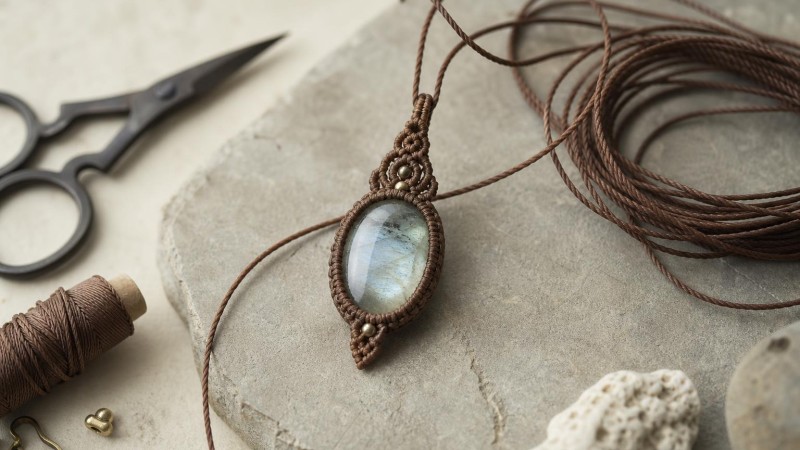
Macrame stone wrapping turns a favorite gemstone, crystal, or polished pebble into wearable jewelry using cord and carefully placed knots. Unlike drilled-stone designs, this technique creates a fitted textile cradle around the stone, making it especially useful for cabochons, tumbled stones, and naturally shaped specimens without holes.
This comprehensive macrame stone wrapping guide explains how to choose a suitable stone and cord, build a secure net, form a pendant bail, and troubleshoot common problems. The basic method is approachable for beginners, but it also provides a foundation for more elaborate micro-macrame jewelry.
What Is Macrame Stone Wrapping?
Macrame is the craft of creating structures and decorative patterns by knotting cord. Its history spans multiple cultures and centuries, and modern jewelry makers use scaled-down versions of traditional knots to create intricate wearable designs. In stone wrapping, knots replace glue, drilled holes, or metal settings as the primary means of securing the centerpiece.
A macrame stone pendant typically consists of two interconnected sections. A net or basket grips the lower and side edges of the stone, while cords gathered above it form a bail or loop for hanging the finished piece. The technique works particularly well with cabochons, whose broad faces provide an attractive focal point and whose edges can be captured by closely fitted knots.
Stone wrapping can also highlight the symbolism historically attached to gemstones. For example, amethyst has traditionally been associated with clarity and protection in various forms of folklore. Such associations are cultural traditions rather than established medical properties, so a stone can be chosen simply for its color, pattern, provenance, or personal significance.
Materials and Tools You Will Need
You do not need a large collection of equipment to begin. Cord, a stone, scissors, and a stable work surface are enough for a basic project. A cork board, macrame board, or firm foam board is helpful because it lets you pin the work in place while maintaining tension.
- A cabochon, tumbled stone, crystal, or smooth pebble
- Waxed polyester, nylon, cotton, or other jewelry cord
- Sharp scissors
- Measuring tape or ruler
- Macrame or cork board
- T-pins or sturdy sewing pins
- Optional lighter or thread burner for suitable synthetic cord
- Optional beads for decorative accents
Small gemstone beads can be threaded onto selected cords before finishing the bail or fringe. Make sure each bead hole is large enough for the chosen cord; checking the hole diameter before starting avoids frustration later.
Choosing the Right Cord
Cord strongly influences both appearance and performance. Waxed polyester is a popular choice for detailed jewelry because it holds knots well and is available in fine diameters. Nylon can produce crisp, precise work, while cotton offers a softer, more organic appearance but may have more surface fuzz and can behave differently under tension.
For a first pendant, cord around 0.8 to 1 mm in diameter is usually manageable. Very fine cord allows elaborate patterns but requires more knots and precise tension. Thick cord develops quickly but can overwhelm a small stone. Before cutting your project cords, make several square knots with a short sample to learn how the material behaves.
Choosing a Beginner-Friendly Stone
An oval or teardrop-shaped stone with a reasonably consistent thickness is easier to capture than a sharply irregular specimen. Look for a defined edge around which the knotted net can grip. Highly rounded, spherical, or very slippery stones require more careful net geometry.
Flat agate stones are particularly interesting for wrapping because natural banding can remain visible rather than being obscured by a heavy setting. Whatever material you choose, inspect it for fragile points, sharp edges, and existing cracks before pulling cord tightly around it.
Essential Macrame Knots to Know
You can create a surprisingly sophisticated pendant using only a few knots. Practice each one separately before working around your stone. Consistency matters more than speed: evenly tightened knots create a more balanced setting.
Square Knot
The square knot uses four cords: two central filler cords and two working cords. Pass the left working cord over the center cords and under the right cord. Bring the right cord beneath the center pair and up through the loop on the left. Tighten evenly. Repeat in the opposite direction to complete a balanced square knot.
Half Knot and Spiral
A half knot is essentially one side of a square knot. Repeating half knots in the same direction naturally creates a spiral. This is useful for decorative bails, side details, and necklace cords, although it is less suitable where you need a perfectly flat section.
Double Half Hitch
Double half hitches can produce lines, borders, and curved structures. One cord acts as the holding cord while another is looped around it twice. Once the basic stone net feels comfortable, this knot opens up many possibilities for decorative micro-macrame patterns.
Step-by-Step Macrame Stone Wrapping Tutorial
The following method creates a simple netted pendant. Exact measurements depend on stone size and cord thickness, so treat the suggested proportions as a starting point. Keeping your stone nearby throughout the process is essential because frequent fitting produces a more secure result than relying on measurements alone.
Step 1: Measure and Cut the Cord
Cut four lengths of cord, each approximately six to eight times the height of your stone. A larger pendant, decorative bail, or elaborate knot pattern requires additional length. It is better to leave a reasonable working margin because adding cord neatly in the middle of a structural section can be difficult.
Align the four cords so their ends are even. Find their centers and secure that midpoint to your board with a pin. You now have eight working cord ends, which will become the two sides of the stone net.
Step 2: Create the Lower Cradle
Divide the cords into adjacent groups of four and tie square knots near the center point. Reorganize neighboring cords and tie another row slightly farther outward, creating interconnected openings. Think of this structure as a flexible fishing net: each connection prevents the stone from escaping through the space beside it.
Keep the first openings relatively small. If the gaps are wider than the narrowest part of the stone, the centerpiece may slip out even if the upper knots appear tight.
Step 3: Test-Fit the Stone
Place the stone over the developing net and gently bring the cord structure around its lower edge. The first row should sit beneath the stone's widest area rather than directly on its face. Adjust individual knots before tightening them firmly.
Remove the stone and compare the left and right sides. If one side is visibly longer, correct the tension now. Small asymmetries become increasingly difficult to fix once additional rows are tied.
Step 4: Build the Side Net
Continue tying alternating square knots along each side. After every row, put the stone back into the cradle and check where the next knots should land. Your goal is to position junctions along the edge while leaving as much of the attractive front surface visible as possible.
A polished tumbled stone may need a denser net than a flat cabochon because its curved surfaces can slide against the cord. Adding an extra row is generally preferable to compensating with excessively tight knots.
Step 5: Enclose the Upper Edge
Once the net reaches slightly above the stone's widest section, insert the stone and bring the left and right cord groups together above it. Tie secure square knots while maintaining firm, even tension. Check the back as well as the front: a setting that looks centered from one direction can still have crossed or twisted cords behind the stone.
Test security by gently tilting the pendant over a padded surface. The stone should remain captured without relying on extreme compression. Macrame works through the geometry of the net and the placement of its knots, not simply through pulling every cord as hard as possible.
Step 6: Form the Pendant Bail
Gather the cords above the wrapped stone. Separate them into working and filler cords and make a compact series of square knots, alternating half knots, or decorative hitches. Bend this knotted section into a loop large enough for your intended necklace cord, then secure its base with additional knots.
If you plan to connect the pendant to a chain instead, appropriately sized jump rings can offer another design option, provided the macrame loop is constructed to accommodate the finding without excessive abrasion.
Step 7: Finish the Cord Ends
Decide whether you want a clean finish or decorative fringe. For a compact pendant, finish the remaining ends according to the cord manufacturer's recommendations. Certain synthetic cords can be carefully heat-sealed, but natural fibers should not be treated this way. Work cautiously because molten synthetic material can become extremely hot.
Alternatively, incorporate the ends into a short decorative section and trim them neatly. A small amount of suitable jewelry adhesive is sometimes used by makers as reinforcement, but the underlying knot structure should already be secure rather than depending entirely on glue.
How to Keep Your Stone Wrap Secure
The most common beginner problem is a setting that initially looks tight but loosens when the pendant moves. Security comes from several factors working together: correct stone shape, appropriately sized net openings, consistent cord tension, and well-positioned knots.
- Keep structural knots close enough that the stone cannot pass between them.
- Place the net below and above the stone's widest contours.
- Maintain even tension instead of overtightening isolated knots.
- Check the reverse side frequently for crossed cords.
- Test the finished pendant gently over a soft surface before wearing it.
- Inspect knots and cord periodically, especially on frequently worn pieces.
A small pair of jewelry pliers can help with separate metal findings, but avoid squeezing a gemstone directly with metal tools. Some stones are surprisingly easy to chip or scratch at exposed edges.
Common Macrame Wrapping Mistakes
Using Too Little Cord
Running out of cord near the bail limits your finishing options. Beginner knotters often underestimate how much cord repeated square knots consume. Start generously, especially when practicing a pattern for the first time, and record your measurements so later versions can be planned more efficiently.
Ignoring Tension Changes
A tight knot followed by a loose one creates waves and uneven openings. Try to use the same pulling motion and pressure throughout each row. Pinning completed portions of the project to your board can prevent earlier knots from shifting while you work.
Covering Too Much of the Stone
A secure wrap does not necessarily require a dense web across the front. Position structural cords around edges and natural contours whenever possible. This is particularly valuable with patterned stones such as jasper cabochons, where color variations are part of the design.
Choosing a Fragile Specimen
Macrame is softer than many metal-setting methods, but tension can still place stress on thin points and existing fractures. Save delicate specimens for designs engineered specifically around their shape, and begin with a sturdy, smooth stone while learning.
Ways to Customize Your Macrame Pendant
Once you can create a reliable basic basket, customization becomes much easier. Add contrasting cord colors, incorporate tiny beads into the bail, create symmetrical double-half-hitch borders, or extend spare cords into decorative fringe. Changing just one feature at a time helps you understand how each design choice affects structure.
Metal jewelry findings can also create useful transitions between fiber work and conventional necklace components. Choose findings with smooth surfaces so rough edges do not repeatedly rub against the cord.
You can also let the stone itself guide the design. A strongly patterned mineral may suit a restrained wrap, while a simple monochrome cabochon can support more intricate knotting. Makers interested in gemstone folklore sometimes choose stones for their traditional symbolism; these historical and cultural associations can add narrative meaning without implying scientifically established effects.
Caring for Macrame Stone Jewelry
Store finished pieces where the cord will not snag on sharp jewelry components. Avoid unnecessary soaking because cord fibers, dyes, finishing treatments, and different gemstone materials can react differently to moisture. If cleaning is necessary, first consider the care requirements of both the stone and the specific cord material.
Inspect high-friction areas around the bail and the stone's edges from time to time. Fraying, stretched knots, or movement of the centerpiece indicates that the piece should be restrung or repaired before further wear. Good maintenance matters because a textile setting naturally experiences friction and flexing.
Where to Go After Your First Stone Wrap
After mastering a simple square-knot cradle, experiment with double half hitches, multi-color micro-macrame, bead accents, or adjustable necklace closures. Keep notes about stone dimensions, cord diameter, cut lengths, and the number of knot rows. That simple record can make repeating a successful design considerably easier.
Macrame stone wrapping combines practical knotting with the individuality of natural materials. The key is not complicated decoration but a well-designed structure: choose a suitable stone, build a net that follows its contours, maintain consistent tension, and test the setting carefully. With those fundamentals in place, the same basic technique can evolve into pendants ranging from understated everyday designs to highly detailed micro-macrame work.

Leave a Comment